I don’t know if the universe has it out for me or what, but I swear to you all, the second I start making a conscious effort to eat healthy, I’m suddenly inspired to make all sorts of naughty treats. And not just inspired, like, “Oh, I really, really, really want to make some caramel corn,” but my brain suddenly starts putting together evil ideas for things I’ve never even made. I guess deprivation is great for inspiration, right?
I’m posting my scandalous little treat on Friday, but for today, I want to share a really cool tutorial. I kind of thought I was a genius until I told Sara what I was posting and she told me that she already has a tutorial all photographed. It’s kind of rough sharing a brain sometimes.
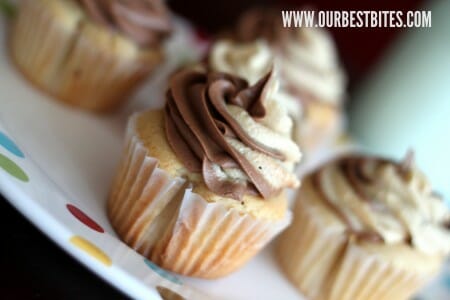
Not only is this super impressive (my 6-year-old told me that he thought the way my cupcakes were “designed” was awesome), but it’s a fun and easy way to implement different colors when you’re decorating cupcakes. Like for these Colorburst Cupcakes that Sara posted this last spring during March Madness.

For this tutorial, I’m just using two colors of icing, but you could easily use three (or even four if you’re feeling wild) different colors for a really cool rainbow effect. You can also play around with flavors, using different types of icing or adding different flavors to a something like our Perfect Cupcake Frosting and Filling. Chocolate and caramel, chocolate and peanut butter, chocolate and orange, orange and lemon, vanilla and almond, vanilla and peppermint, peppermint and chocolate…you’ve pretty much got unlimited options.
You’ll need icing, disposable decorating bags (one for each color and then one more to fit them all into), and a large decorating tip (like this, this, or this) and a large coupler.
The most basic thing to remember is that no matter how many different colors you’re using, you don’t want the final bag to be too full. So if I’m using two colors, I’ll fill each color bag a little less than 1/2 full with icing. If I were using 3, I’d fill them a little less than 1/3 full, and for 4, a little less than 1/4 full. Make sense?
After you’ve filled your bags, flatten them out and stack them on top of each other…
and then trim 1/2 inch or so off the tip of each bag and slip them into the bag fitted with the decorating tip.

Firmly squeeze the bag until you’re getting equal parts of each icing from the tip. I will say that it’s a little trickier if you’re using two different types of icing (like I am here) than if you use different colors of the same icing (like Sara did). If you do use two different types of icing, try to make sure they’re roughly the same consistency before icing your cupcakes, even if it means popping a softer icing into the freezer for a few minutes.
To ice your cupcakes, hold the tip close to the top of the cupcake. Using firm, steady pressure, squeeze the icing bag, starting in the center of the cupcake and moving around the edges of the cupcake and then one more swirl on top, moving back towards the center. I actually had a video tutorial of this at one point, but Dropshots spontaneously deleted all my pictures and videos (yes, Dropshots, I’m totally calling you out, jerks!), so I’ll try and get another one up today because it’s not nearly as complicated as it sounds.
I’m posting my scandalous little treat on Friday, but for today, I want to share a really cool tutorial. I kind of thought I was a genius until I told Sara what I was posting and she told me that she already has a tutorial all photographed. It’s kind of rough sharing a brain sometimes.
Not only is this super impressive (my 6-year-old told me that he thought the way my cupcakes were “designed” was awesome), but it’s a fun and easy way to implement different colors when you’re decorating cupcakes. Like for these Colorburst Cupcakes that Sara posted this last spring during March Madness.

For this tutorial, I’m just using two colors of icing, but you could easily use three (or even four if you’re feeling wild) different colors for a really cool rainbow effect. You can also play around with flavors, using different types of icing or adding different flavors to a something like our Perfect Cupcake Frosting and Filling. Chocolate and caramel, chocolate and peanut butter, chocolate and orange, orange and lemon, vanilla and almond, vanilla and peppermint, peppermint and chocolate…you’ve pretty much got unlimited options.
You’ll need icing, disposable decorating bags (one for each color and then one more to fit them all into), and a large decorating tip (like this, this, or this) and a large coupler.

The most basic thing to remember is that no matter how many different colors you’re using, you don’t want the final bag to be too full. So if I’m using two colors, I’ll fill each color bag a little less than 1/2 full with icing. If I were using 3, I’d fill them a little less than 1/3 full, and for 4, a little less than 1/4 full. Make sense?

After you’ve filled your bags, flatten them out and stack them on top of each other…

and then trim 1/2 inch or so off the tip of each bag and slip them into the bag fitted with the decorating tip.

Firmly squeeze the bag until you’re getting equal parts of each icing from the tip. I will say that it’s a little trickier if you’re using two different types of icing (like I am here) than if you use different colors of the same icing (like Sara did). If you do use two different types of icing, try to make sure they’re roughly the same consistency before icing your cupcakes, even if it means popping a softer icing into the freezer for a few minutes.
To ice your cupcakes, hold the tip close to the top of the cupcake. Using firm, steady pressure, squeeze the icing bag, starting in the center of the cupcake and moving around the edges of the cupcake and then one more swirl on top, moving back towards the center. I actually had a video tutorial of this at one point, but Dropshots spontaneously deleted all my pictures and videos (yes, Dropshots, I’m totally calling you out, jerks!), so I’ll try and get another one up today because it’s not nearly as complicated as it sounds.

Comments
Post a Comment